Sunday 28 April 2013

Inkylicious Alliums Again


The main image for this card was created using the same stamps & Adirondacks as my last post, but I wanted it to have a different feel to the first one.  In any case, I try to avoid making two cards the same.  For the background this time I simply stamped the Inkylicious script stamp twice in Memento Teal Zeal, added some plain white organza ribbon & a Meiflower diamante buckle.  I did try to colour the ribbon with Adirondacks but got more ink on myself than the ribbon & also found that it just didn't seem to dry so gave that up as a bad job!
Cardstock: Xerox Colotech Plus 300gsm
Stamps: Inkylicious, Imagination Crafts
Inks: Adirondack Cloudy Blue, Sailboat Blue, Denim, Memento Teal Zeal


Saturday 27 April 2013

More Inky Experiments


This time with Inkylicious stamps & sponging with Adirondack inks.  The main image is the Inkylicious Allium 2-step stamp inked up with Memento Paris Dust & Adirondack Sailboat Blue, and you'll see from the picture below that I didn't manage to stamp it quite perfectly but I decided that I didn't mind the offset effect & used the image anyway.


The background to the main image was then sponged using Adirondacks Cloudy Blue, Sailboat Blue & Denim.  I spent ages trying to decide how to finish the card off until I decided to keep it simple, sponging again straight onto the main card & then partially inking up an Inkylicious small script stamp with a combination of the same inks.  The greeting was from Imagination Crafts, stamped in Memento Nautical Blue and I added a trio of square gems to finish.


Cardstock: Xerox Colotech Plus 300gsm
Stamps: Inkylicious, Imagination Crafts
Inks: Adirondack Cloudy Blue, Sailboat Blue, Denim
Memento: Paris Dusk, Nautical Blue


Monday 22 April 2013

Vintage Car


Another card which was the result of experimenting well outside my comfort zone, but which I thoroughly enjoyed making. The backing paper was made using an Imagination Crafts Diamond background stencil, sponging through it with various Distress & Memento inks.  When it was finished I didn't like the white background so I brayered over it with Distress Antique Linen.  Straight edges to the paper just didn't look right somehow, so I tore them & re-inked the edges with Antique Linen again.


The main image from Inkadinkado was stamped with Memento Rich Cocoa onto an Inkylicious tag which was sponged round the edges with Distress Antique Linen.  I replaced the original string with twine.


The numbers started out as bare chipboard which I gessoed (is there such a word?!), embossed in my Cuttlebug & inked repeatedly until the colour was fairly close to the Kraft base card - closer than the photos would have you believe.  I also sponged round the edges of the base card to add a little bit of extra depth.

More experiments to follow!

Supplies:
Stamps: Inkadinkado
Stencil: Imagination Crafts Diamond
Inks: Memento Rich Cocoa, Peanut Brittle, Toffee Crunch, Distress Antique Linen.


Thursday 18 April 2013

Flutter Vine Birthday


This card was made using my some of my purchases from a craft show at Leigh the other week.  I bought my first Memory Box die, Flutter Vine, as I thought it would go with one of my purchases from a few weeks ago, the Papermania Whimsy Tri-Boss embossing folder.  The "frame" was cut using the Spellbinders Card Creator Matting Basics set B.

I was inspired by this card, and did initially brayer the embossing folder with Adirondack ink so that the embossed card was coloured but the result was too patchy so I decided white on white would have to do.  

Finished card size: A6
Cardstock: Colotech Plus 300gsm
Papermania Tri-Boss Embossing Folder: Whimsy
Memory Box Flutter Vine die
Adirondack Cool Peri Ink

Monday 15 April 2013

Watercolouring with Silkies


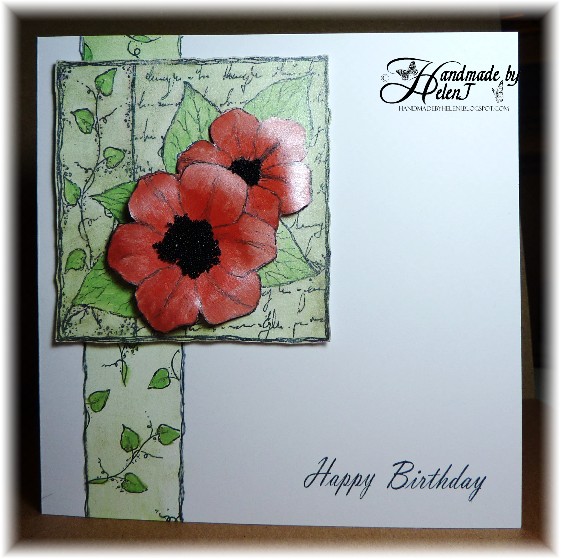
I bought some Imagination Craft Silkies cheap at the QVC Outlet recently & this is my first real attempt to paint with them. I didn't use the supplied brush because it wouldn't allow me to create the fine detail I needed.  For the main image, which is from an Imagination Crafts decoupage stamp set, I painted the background in diluted Apple Lace, then coloured the leaves with it undiluted. The flowers were painted in Sunset Satin and Firecracker Satin, and I did two layers of the smaller flower & three of the larger one, layering them up with Collall dimensional glue.  American Crafts Pop! Microbeads were used for the flower centres, stuck on with Cosmic Shimmer glue.


For the background strip I masked off a section of the card & used diluted Apple Lace again, then stamped smaller individual stamps from this decoupage set & another Imagination Crafts set to create the background pattern.  This was where I got really creative!  Using Memento Tuxedo Black ink on an  Inkssentials Cut-n-Dry Pen Nib, I drew along the edge of the strip a few times to match the edge of the stamped main image.  I'm quite pleased with how it turned out, despite the fact that both decoupage & shiny finishes really aren't normally my sort of crafting!  It's good to go out of your comfort zone sometimes.  My late father was a very talented watercolour artist. I thought about him a lot while I was making this card & I think he'd have liked the finished result.


Cardstock: Base - Colotech Plus 300gsm, Flowers - Southfield Stationers 160gsm
Stamps: Imagination Crafts decoupage range
Ink: Memento Tuxedo Black
Paints: Imagination Craft Silkies
Microbeads: American Crafts Pop!


Tuesday 9 April 2013

Men!

They're so difficult to make cards for, aren't they?  I needed to make a couple of men's cards but didn't have much time, so this image from the Digistamp Boutique came in handy.  I resized it in Craft Artist 2 Professional & coloured it with Promarkers.  The greetings are from Craftwork Cards (also coloured with Promarkers) and the backing papers I designed in Craft Artist, colouring them to match - yes, you've guessed it! - Promarkers.


Cardstock: Xerox Colotech Plus 300gsm
Backing papers: Designed by me

Friday 5 April 2013

Hello Baby!

My husband asked me to make a card for a friend of his who became a father for the first time this week.  Also this week, the new Craft Stamper dropped through my front door and the cover article (Tipsy Glitter) caught my eye straight away so I decided to give the technique a try.  It uses adhesive sheets, stamping, Glamour Dust & alcohol ink markers and - for once - I had all the "ingredients" to hand.  Although the article says that the flexible nib of Copics was necessary, I mostly had Promarkers which I found worked just fine, too. It's quite an easy technique but it does make it hard to see the detail of the stamp as you colour in: as I've typed this up I've realised that what I thought was a flower is in fact supposed to be a bee - oops, never mind, hopefully no-one will notice!


Cardstock: Colotech Plus 300gsm
Ink: Brilliance Starlight Black, Versafine Onyx Black
Stamps: Crafthouse Press K001 Dandelion "Bee", greeting: maker unknown
Promarkers: Pastel Blue, Cornflower, Oatmeal
Embellishments: from stash

Monday 1 April 2013

Digistamp Boutique Birthday Card

The new flower stamp releases at Digistamp Boutique caught my eye straight away (and were on special offer!) so I just had to have them. There are some lovely samples on the website & I originally planned to use kraft cardstock, but once I started making this card for a friend I changed my mind and this just evolved into the finished article.

I imported the flower stamp & greeting (part of the set) into Craft Artist 2 Professional & added the lines.  Then I decided a bit of bling was required so I used Crystal Glamour Dust on some of the dots and mounted the finished image on black card.  Done!


Cardstock: Xerox Colotech Plus 300gsm
Digital stamp & greeting: Digistamp Boutique
Crystal Glamour Dust